
Introduction
Have you ever felt like you’re making a cup of coffee while waiting for your Windows 11 computer to finally boot up? That agonizing wait, staring at the spinning circle, can be frustrating. It’s like watching a snail try to win a race! You’re not alone. Many Windows 11 users experience slow boot times. The good news? You don’t need to spend hundreds of dollars on new components to make your computer faster. There are proven tweaks and adjustments you can implement without new hardware to help your PC zip through the startup process and get you working, gaming or just browsing, faster. In this blog, I’ll show you five practical methods to make Windows 11 boot faster and speed up Windows 11 startup by focusing on optimizing its existing settings. Let’s dive in!
1. The Startup Program Purge: Your First Line of Defense
Think of your computer’s startup as a busy city street during rush hour. Every program that loads when you boot up is like another car trying to get on the road. The more “cars,” the longer the traffic jam and the slower the whole process! This is where startup programs come in. Many applications install themselves to launch every time you power on your computer, even if you don’t immediately need them. This greatly contributes to a sluggish start-up. Luckily, you have the power to control this. Learning how to disable startup programs Windows 11 can drastically reduce your Windows 11 boot time.
Here’s how you can do it:
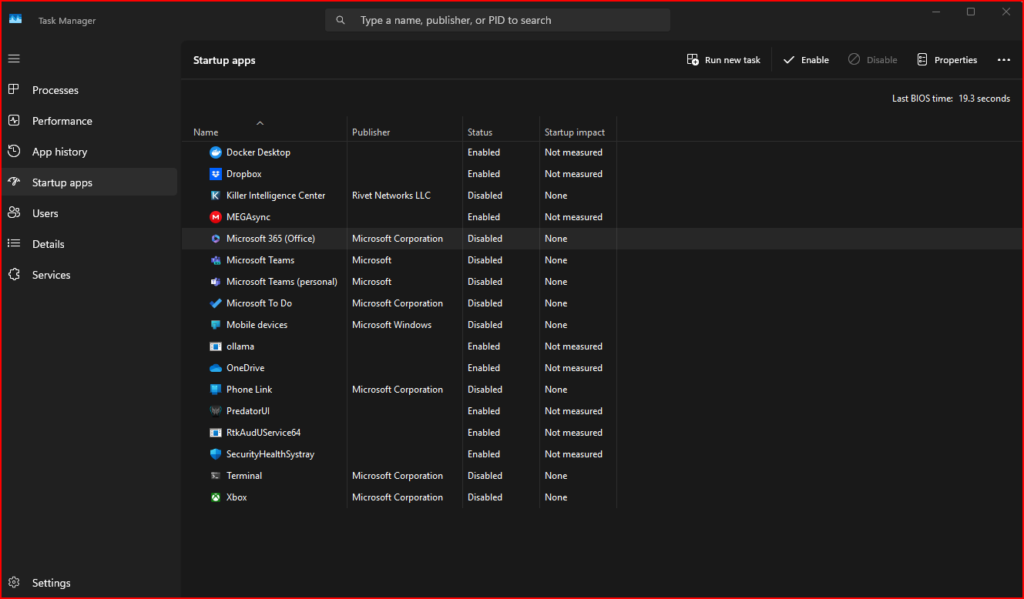
- Open Task Manager: Press Ctrl + Shift + Esc to open the Task Manager. Alternatively, right-click on the Taskbar and select “Task Manager.”
- Navigate to the Startup Apps Tab: Click the “Startup Apps” tab at the top of the window.
- Review the List: You’ll see a list of all the programs that are set to launch when your computer starts.
- Disable Unnecessary Programs: Look at the “Status” column. Anything with “Enabled” is slowing you down. Select a program you don’t need to launch at startup and click the “Disable” button in the bottom-right corner. Be cautious; don’t disable anything you are unfamiliar with.
- Some Common Culprits to Disable: Programs like Skype, OneDrive (if you’re not using it consistently), Spotify, or any application that automatically updates in the background could be good places to start.
Pro Tip: After disabling startup programs, restart your computer to see the difference. You’ll likely notice a significant improvement in your boot time. This single change is often the most effective in achieving a quick startup Windows 11.
By taking control of your start-up programs you’re essentially clearing the streets, allowing your PC to move much faster!
2. The Power of Fast Startup: Turbocharging Your Boot
Windows 11 has a feature called “Fast Startup” (also known as Hybrid Shutdown) designed to significantly reduce boot times. It works by putting your system into a hibernation-like state, allowing it to start much quicker than a full shutdown. Imagine it’s like your computer taking a short nap instead of a long, deep sleep. It wakes up far quicker. This feature is usually enabled by default, but it’s worth checking to ensure it’s active, and if it’s not, switch it on for a notable speed up Windows 11 startup.
Here’s how to enable (or verify) Fast Startup:
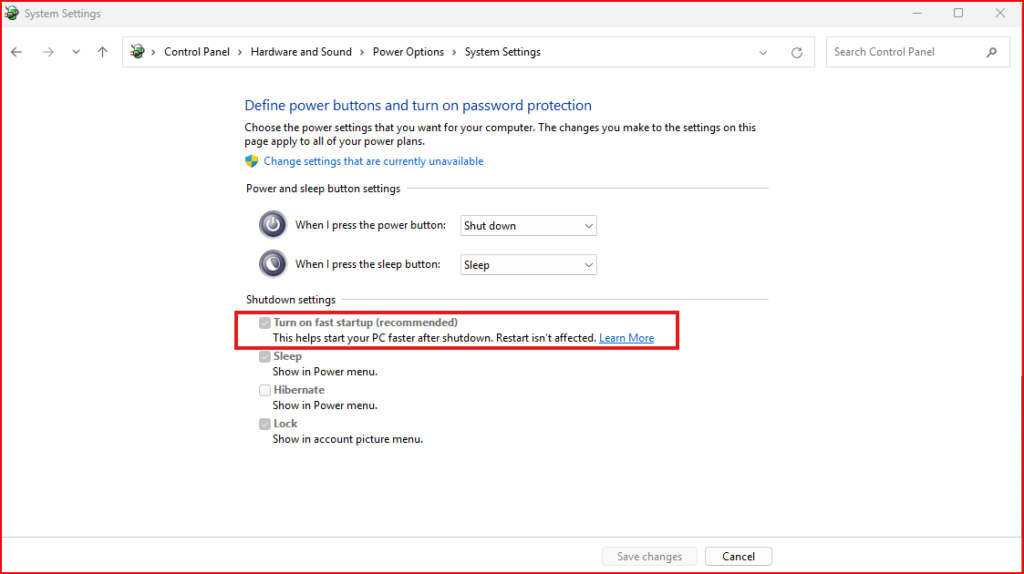
- Open the Control Panel: Type “Control Panel” into the Windows search bar and open the app.
- Go to Power Options: Select “Hardware and Sound,” then click on “Power Options.”
- Choose “Choose What the Power Buttons Do”: Click on the link in the left-hand sidebar.
- Change Settings that are Currently Unavailable: If it’s greyed out, you’ll need to click the “Change settings that are currently unavailable” link.
- Enable Fast Startup: Make sure that “Turn on fast startup (recommended)” is checked.
- Save Changes: Click “Save changes.”
Why it Works: Fast Startup is highly effective because it saves the state of your kernel and drivers to a file on your hard drive. When you turn on your computer, it reloads this data instead of starting everything from scratch. This bypasses many initialization processes and results in faster boot times, significantly contributing to faster Windows 11 without upgrades.
A Note of Caution: While very effective, Fast Startup can sometimes cause issues with hardware or when you are making system changes. If you experience problems, try disabling it temporarily, and then re-enabling it.
3. The Visual Effects Diet: Slimming Down Your System
Windows 11 comes with plenty of eye candy, like animations and visual effects that make the user experience appealing. However, all these fancy graphics consume system resources which contributes to a slower computer boot. Like a car carrying unnecessary weight, these effects can drag down your performance, including startup. So, giving your computer a “visual effects diet” can result in a leaner, faster start. You will be amazed at the performance gain by implementing these Windows 11 performance tweaks.
Here’s how you can reduce these effects:
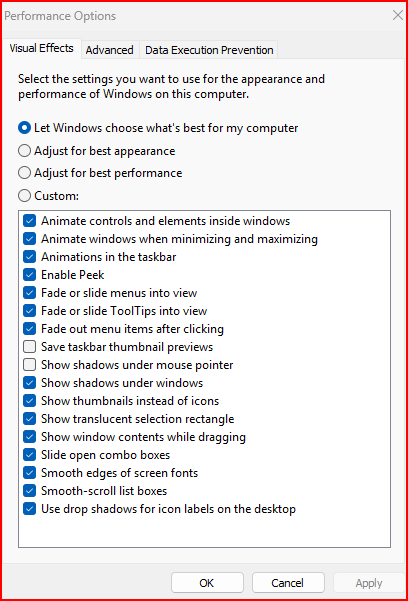
- Open System Properties: Type “system” in the Windows search bar and click on “System.”
- Advanced System Settings: In the new window, click “Advanced system settings” on the left.
- Performance Settings: Under the “Performance” section, click “Settings.”
- Visual Effects Tab: Click the “Visual Effects” tab.
- Choose Custom: Select the “Adjust for best performance” option or “Custom”. Choosing custom allows you to select specific elements you want to keep.
- Customize (Optional): You can customize these settings. Keep “smooth edges of screen fonts” to keep the text readable. You could unselect other options such as “Animations in the taskbar” and “show shadows under windows”.
- Apply Your Changes: Click “Apply” and then “OK.”
The Result: While you might lose some of the visual flair of Windows 11, you’ll likely gain noticeable performance improvements, including a quicker startup Windows 11 settings. It’s a trade-off that many find worthwhile, especially on older machines. These speed tips for Windows 11 often get overlooked but make a big difference.
4. Hard Drive Health: Cleaning Up Clutter
Imagine your hard drive as your wardrobe. If it’s packed with clothes you no longer wear (old files, unused programs), it becomes harder to find what you need, slowing everything down. An overcrowded hard drive can significantly impact your PC’s performance and can even lengthen your boot time. That’s why it’s essential to clean up your digital wardrobe by deleting old files and optimizing your hard drive. Regular hard drive maintenance contributes towards improving Windows 11 boot speed.
Here are some effective cleaning strategies:
- Disk Cleanup:
- Type “Disk Cleanup” into the Windows search bar and open the app.
- Select the drive you want to clean (usually C:).
- Check the boxes for the files you want to delete. These can include temporary files, system error memory dumps, and downloaded program files.
- Click “OK” and then “Delete Files.”
- Uninstall Unused Programs:
- Go to “Settings” > “Apps” > “Installed apps.”
- Review the list and uninstall programs you no longer use.
- Delete Large Files You No Longer Need: Manually search for and delete large files or folders that you know are not necessary for daily computer use. Sort files by size to easily locate space hogs.
- Turn on Storage Sense:
- Go to “Settings” > “System” > “Storage.”
- Turn “Storage Sense” on. This feature will automatically delete unnecessary files and keep your hard drive organized. You can customize how often Storage Sense runs.
The Benefits: By cleaning up and optimizing your hard drive, you’re not only freeing up storage space but also improving overall system performance. This contributes to speed up Windows 11 startup and helps it run more smoothly. Think of it as decluttering your house; it’s less of a chore, and quicker, to get where you want to go.
5. The Power Plan Optimization: Balancing Performance and Energy
Windows 11 offers different power plans that manage how your computer utilizes its resources. By default, it’s set to “Balanced,” which is a compromise between performance and energy consumption. But if you’re looking to optimize Windows 11 performance for faster boot times and overall speed, switching to the “High Performance” plan can make a significant difference, especially when it comes to quicker boot times.
Here’s how to change the power plan:
- Open the Control Panel: Type “Control Panel” into the Windows search bar and open it.
- Go to Power Options: Select “Hardware and Sound,” then click “Power Options.”
- Choose High Performance: Select the “High performance” option. If it’s not showing, click the dropdown button to reveal it.
- Customize (Optional): You can click “Change plan settings” to customize how this power plan works. You can modify how quickly your screen dims and how quickly your PC goes into sleep mode.
- Save Changes: Close the window.
Why This Works: The “High Performance” power plan tells your computer to use its resources to the maximum. This leads to faster processing speeds, resulting in a faster Windows 11 without upgrades, better application responsiveness, and notably quicker boot times.
Keep in Mind: Using the “High performance” power plan can result in higher energy consumption. If battery life is a concern, you might want to switch to a balanced power plan when you’re not needing peak performance or when working away from a power source.
Final Thoughts: Your Journey to a Faster Windows 11
Dealing with a slow booting computer is no fun, but thankfully, you have the power to take control and implement changes yourself without having to purchase new hardware. By implementing these five steps to make Windows 11 boot faster, you’ll be able to significantly reduce your boot times and improve the overall performance of your PC.
Remember these key takeaways:
- Disable unnecessary startup programs.
- Utilize the Fast Startup feature.
- Reduce visual effects.
- Keep your hard drive clean and organized.
- Use the High-Performance power plan when you need a speed boost.
Implement these adjustments, and you’ll see a noticeable difference in how quickly your Windows 11 machine fires up. You’ll finally be able to get to work, gaming, or your favorite browsing websites quicker, and those agonizing wait times will be a thing of the past. With these tips you will find that you can get the most of your current system, so you can enjoy a quick startup Windows 11.
Now it’s your turn to take action and enjoy your much faster computer! What methods have you found most effective for improving Windows 11 performance? Let us know in the comments below!