Introduction
Are you itching to experience the sleek new interface, enhanced features, and overall awesomeness of Windows 11? I know I was! But before you dive headfirst into the upgrade, there’s a crucial question to ask: Can my PC run Windows 11? Understanding the Windows 11 system requirements is the first step to a smooth and successful transition. Don’t worry, we’ll break it all down in plain English.
In this comprehensive guide, we’ll explore everything you need to know about the Windows 11 minimum requirements, helping you determine if your current machine is up to the task. We’ll cover the nitty-gritty details, from CPU compatibility and RAM requirements to the infamous TPM 2.0. Let’s get started!
What are the Windows 11 System Requirements? (The Official List)
Microsoft has set specific hardware requirements to ensure Windows 11 runs smoothly and securely. These aren’t just suggestions; they’re essential criteria. Let’s take a look at the official Windows 11 hardware requirements:
- Processor: 1 gigahertz (GHz) or faster with 2 or more cores on a compatible 64-bit processor or System on a Chip (SoC). This is where things get a little tricky, as not all processors are considered “compatible.” More on that later!
- RAM: 4 GB. Think of RAM as your computer’s short-term memory. The more you have, the better your PC can handle multitasking and running demanding applications.
- Storage: 64 GB or larger storage device. This is the space where Windows 11 and your programs will reside.
- System Firmware: UEFI, Secure Boot capable. UEFI (Unified Extensible Firmware Interface) is a modern replacement for the traditional BIOS. Secure Boot helps prevent malicious software from loading during startup.
- TPM: Trusted Platform Module (TPM) version 2.0. This is arguably the most talked-about requirement. TPM is a security chip that provides hardware-based security features. We’ll dedicate a whole section to this.
- Graphics card: Compatible with DirectX 12 or later with WDDM 2.0 driver. This ensures your graphics card can handle the visual demands of Windows 11.
- Display: High definition (720p) display that is greater than 9″ diagonally, 8 bits per color channel.
- Internet connection and Microsoft account: Windows 11 Home edition requires internet connectivity and a Microsoft account to complete device setup on first use.
These are the official Windows 11 installation requirements – so, let’s dive deeper into each element.
Unpacking the Processor Puzzle: Windows 11 CPU Compatibility
The processor requirement is a significant sticking point for many users. Microsoft maintains a specific Windows 11 CPU compatibility list for both Intel and AMD processors. Why? It’s all about ensuring optimal performance, security, and reliability.
- Intel: Officially, Windows 11 supports 8th-generation Intel Core processors and newer. This means processors like the i7-7700K (a popular CPU from just a few years ago) are not officially supported.
- AMD: On the AMD side, Ryzen 2000 series processors and newer are generally supported.
Why are older processors excluded? Microsoft states that newer processors have features necessary for security and reliability enhancements in Windows 11. These features provide a more secure and stable computing experience.
How do I check my processor? It’s easy!
1. Press Win + R to open the Run dialog box.
2. Type msinfo32 and press Enter.
3. Look for “Processor” in the System Information window. This will tell you the make and model of your CPU.
Once you know your processor, compare it to the official Windows 11 supported processors list on Microsoft’s website. This will definitively tell you if your CPU is officially compatible.
The TPM 2.0 Mystery: What It Is and Why It Matters
The Windows 11 TPM 2.0 requirement has caused quite a stir. TPM stands for Trusted Platform Module. It’s a security chip, either a physical chip on your motherboard or integrated into your processor, that provides hardware-based security features.
What does TPM 2.0 do? It helps protect your system from malware and other security threats by:
- Storing encryption keys securely.
- Verifying the integrity of the boot process.
- Providing secure authentication.
Why is it required? Microsoft emphasizes that TPM 2.0 is crucial for enhancing the security of Windows 11. It’s a key component of their “zero trust” security model. It will help safeguard user data and protect from advanced cyber threats.
How do I check if my PC has TPM 2.0 enabled?
1. Press Win + R to open the Run dialog box.
2. Type tpm.msc and press Enter.
3. If TPM is enabled, you’ll see the TPM Management window with information about the TPM version and status. If it says “Compatible TPM cannot be found,” your PC either doesn’t have a TPM or it’s not enabled in the BIOS/UEFI settings.
Enabling TPM 2.0: If your PC has a TPM but it’s not enabled, you’ll need to access your computer’s BIOS/UEFI settings during startup. The specific steps vary depending on your motherboard manufacturer, but generally, you’ll need to look for settings related to “Security,” “Trusted Computing,” or “TPM.” Consult your motherboard manual or the manufacturer’s website for detailed instructions.
Secure Boot: A Guardian Against Malware
The Windows 11 Secure Boot requirement is closely related to TPM 2.0. Secure Boot is a feature of UEFI that helps prevent unauthorized operating systems and malware from loading during startup. It ensures that only trusted software can run when your PC boots up.
How does Secure Boot work? Secure Boot uses cryptographic keys to verify the integrity of the boot process. It checks the digital signatures of boot loaders, operating system kernels, and other critical components to ensure they haven’t been tampered with.
How do I check if Secure Boot is enabled?
1. Press Win + R to open the Run dialog box.
2. Type msinfo32 and press Enter.
3. In the System Information window, look for “Secure Boot State.” If it says “Enabled,” Secure Boot is active. If it says “Disabled,” you’ll need to enable it in your BIOS/UEFI settings.
Enabling Secure Boot: Similar to enabling TPM 2.0, you’ll need to access your BIOS/UEFI settings to enable Secure Boot. Look for settings related to “Boot,” “Security,” or “UEFI” and enable the Secure Boot option.
RAM and Storage: Enough Room to Roam
The Windows 11 RAM and storage requirements are fairly straightforward. 4 GB of RAM is the minimum, but honestly, 8 GB or more is highly recommended for a smooth and responsive experience. Think of it like this: 4 GB is like a small apartment – enough to live in, but things can get cramped quickly. 8 GB or more is like a larger house with more room to breathe.
Storage: 64 GB is the minimum storage requirement, but again, more is better. A Solid State Drive (SSD) is highly recommended over a traditional Hard Disk Drive (HDD) for significantly faster boot times and application loading.
Graphics and Display: Visual Fidelity
The graphics card requirement ensures that your PC can handle the visual demands of Windows 11. A graphics card compatible with DirectX 12 or later with a WDDM 2.0 driver is essential for rendering the Windows 11 interface and running graphically intensive applications.
The display requirement specifies a high definition (720p) display that is greater than 9″ diagonally, with 8 bits per color channel. This ensures a reasonably sharp and vibrant visual experience.
How to Check if Your PC is Compatible with Windows 11
The easiest way to check if my PC is compatible with Windows 11 is to use Microsoft’s PC Health Check app.
- Download the PC Health Check app: You can find it on Microsoft’s website.
- Install and run the app: Follow the on-screen instructions to install the app.
- Click “Check now”: The app will scan your system and provide a compatibility report.
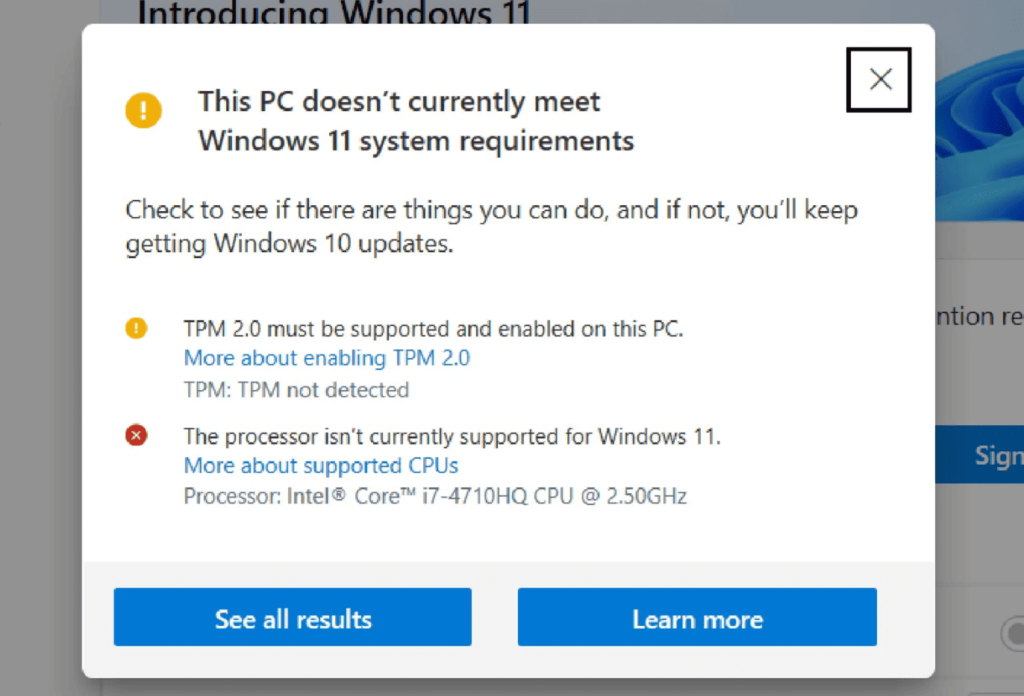
The PC Health Check app will tell you if your PC meets the minimum requirements for Windows 11. It will also highlight any specific issues, such as an incompatible processor or disabled TPM 2.0.
Windows 11 vs Windows 10 System Requirements: What’s Changed?
So, how do the Windows 11 vs Windows 10 system requirements stack up? Here’s a quick comparison:
| Requirement | Windows 10 | Windows 11 |
| Processor | 1 GHz or faster | 1 GHz or faster with 2 or more cores on a compatible 64-bit processor or SoC |
| RAM | 1 GB (32-bit) or 2 GB (64-bit) | 4 GB |
| Storage | 16 GB (32-bit) or 20 GB (64-bit) | 64 GB or larger |
| System Firmware | BIOS | UEFI, Secure Boot capable |
| TPM | TPM 1.2 (optional) | TPM 2.0 |
| Graphics card | DirectX 9 or later with WDDM 1.0 driver | DirectX 12 or later with WDDM 2.0 driver |
| Display | 800 x 600 | High definition (720p) display that is greater than 9″ diagonally |
| Internet Connection | Not required for initial setup of Home edition | Required for initial setup of Home edition with Microsoft account |
The key differences are the stricter processor requirements, the increased RAM and storage requirements, the mandatory UEFI and Secure Boot, and the TPM 2.0 requirement. These changes reflect Microsoft’s focus on security and performance in Windows 11.
Windows 11 Free Upgrade Eligibility: Who Gets It?
If your PC meets the Windows 11 upgrade requirements, you may be eligible for a free upgrade from Windows 10. Microsoft offered a free upgrade to Windows 11 for eligible Windows 10 PCs for a limited time. Now the free upgrade has ended, but there are still options to bypass Windows 11 system requirements.
How to Bypass Windows 11 System Requirements (Proceed with Caution!)
While Microsoft strongly recommends meeting the official Windows 11 system requirements, there are ways to bypass Windows 11 system requirements. However, proceed with extreme caution! Bypassing the requirements can lead to instability, performance issues, and security vulnerabilities. It’s generally not recommended for average users.
Disclaimer: Bypassing system requirements is not officially supported by Microsoft and may void your warranty. Proceed at your own risk!
Here are a couple of methods (use with caution):
- Registry Edit (Method 1): This method involves editing the Windows Registry to bypass the TPM 2.0, Secure Boot, and RAM checks during installation. Important: Incorrectly editing the Registry can damage your system. Back up your Registry before making any changes.
- During Windows 11 setup (after booting from the installation media), press Shift + F10 to open the Command Prompt.
- Type regedit and press Enter to open the Registry Editor.
- Navigate to HKEY_LOCAL_MACHINE\SYSTEM\Setup.
- Create a new key named LabConfig.
- Inside LabConfig, create two new DWORD (32-bit) Values:
- BypassTPMCheck and set its value to 1.
- BypassSecureBootCheck and set its value to 1.
- BypassRAMCheck and set its value to 1 for PCs with less than 4GB of RAM (Not Recommended).
- Close the Registry Editor and the Command Prompt, then continue with the installation.
- Modifying the ISO (Method 2): This method involves modifying the Windows 11 ISO file to remove the compatibility checks. This is a more advanced technique and requires specialized software.
Important Considerations:
- Security Risks: Bypassing the TPM 2.0 and Secure Boot requirements can significantly reduce your system’s security.
- Performance Issues: Running Windows 11 on unsupported hardware may result in poor performance and instability.
- Lack of Updates: Microsoft may not provide updates for systems that don’t meet the minimum requirements.
Conclusion: Is the Upgrade Worth It?
Upgrading to Windows 11 can be an exciting experience, but it’s essential to understand the system requirements and ensure your PC is compatible. Before you do anything, check if my PC can run Windows 11 – use Microsoft’s PC Health Check App!
While there are ways to bypass the requirements, doing so can come with significant risks. It’s generally best to upgrade your hardware or stick with Windows 10 if your PC doesn’t meet the minimum specifications.
By understanding the Windows 11 system requirements, you can make an informed decision about whether to upgrade and ensure a smooth and enjoyable computing experience. Good luck!